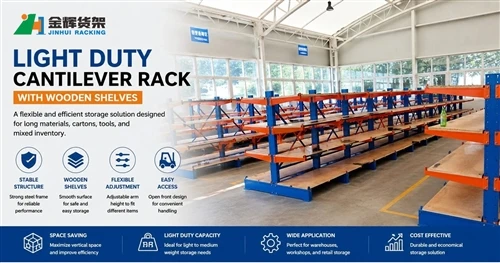
Single sided cantilever racks are one of the most efficient storage systems for long, bulky, and irregularly shaped materials. They are widely used in warehouses, manufacturing plants, lumber yards, metal service centers, and building material distribution facilities.
However, even the highest-quality rack system can only achieve its designed load capacity and safety performance when installed correctly. In this guide, we will walk through the complete assembly process of a Single Sided Cantilever Rack, using a simple five-step installation method.
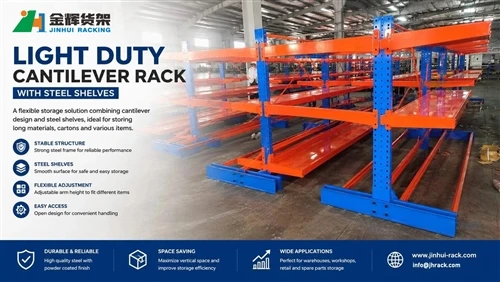
Single Sided Cantilever Rack Assembly Diagram

Why Proper Installation Matters
Correct installation directly impacts:
- Rack stability and structural integrity
- Maximum load-bearing capacity
- Worker safety during loading and unloading
- Long-term durability and maintenance costs
- Compliance with warehouse safety standards
A properly assembled cantilever rack minimizes the risk of rack movement, arm deflection, and uneven load distribution.
Step 1: Install the Upright and Base
The installation process begins with connecting the upright column to the base.
The upright serves as the primary vertical support structure, while the base provides overall stability and transfers loads to the floor.
During installation:
- Position the base according to the layout drawing.
- Securely connect the upright to the base.
- Check that the upright is perfectly vertical.
- Verify anchor bolt locations if floor anchoring is required.
Accurate positioning at this stage ensures smooth assembly of all subsequent components.
Step 2: Add the Second Upright
After the first upright is installed, position the second upright according to the specified bay width.
The spacing between uprights determines the storage capacity and load distribution of the rack system.
Key considerations include:
- Maintaining exact center-to-center spacing.
- Checking floor levelness.
- Ensuring both uprights remain vertically aligned.
- Confirming dimensional tolerances before proceeding.
Proper alignment at this stage significantly improves rack stability.
Step 3: Install Cross Bracing
Cross bracing connects adjacent uprights and creates the structural framework of the cantilever rack system.
The bracing performs several important functions:
- Prevents lateral movement.
- Improves structural rigidity.
- Enhances load distribution.
- Increases resistance to dynamic forces during forklift operations.
After installation, verify that all bolts are tightened according to the manufacturer's torque specifications.
Step 4: Mount Cantilever Arms
Once the frame structure is complete, the cantilever arms can be installed.
Cantilever arms support the stored materials and are available in different lengths and load capacities depending on the application.
When installing arms:
- Follow the designed arm spacing.
- Install arms at consistent elevations.
- Verify locking pins are properly engaged.
- Check arm levelness across the entire rack row.
The number and spacing of arms should match the dimensions and weight of the stored products.
Step 5: Install Deck Panels
For applications involving pallets, cartons, sheet goods, or smaller products, deck panels can be added to the cantilever arms.
Deck panels create a flat storage surface and provide additional versatility.
Benefits include:
- Storage of irregular products.
- Protection of stored materials.
- Improved load distribution.
- Enhanced warehouse flexibility.
Depending on the application, steel panels, wire mesh decks, timber decking, or custom shelf panels may be used.
Common Applications of Single Sided Cantilever Racks
Single sided cantilever racks are commonly used to store:
- Steel pipes and tubing
- Aluminum profiles
- Lumber and timber
- PVC pipes
- Building materials
- Furniture components
- Metal bars and rods
- Sheet materials
Because the rack is accessible from one side only, it is often installed against walls to maximize warehouse space utilization.
Installation Safety Tips
Before placing the rack into service, perform a complete safety inspection.
- Inspect all bolts and fasteners.
- Verify upright plumbness.
- Check arm locking mechanisms.
- Confirm floor anchors are securely installed.
- Review load capacity labels.
- Conduct a test load if required.
Routine inspections should be scheduled to ensure ongoing operational safety.
Choosing the Right Cantilever Rack System
The ideal rack configuration depends on several factors:
- Material dimensions
- Maximum load weight
- Warehouse ceiling height
- Forklift operating requirements
- Future storage expansion plans
Working with an experienced rack manufacturer ensures the system is designed to meet both operational and safety requirements.
Conclusion
Installing a single sided cantilever rack correctly is critical for achieving maximum storage efficiency, safety, and durability. By following the five-step process-installing uprights, adding the second column, assembling bracing, mounting cantilever arms, and fitting deck panels-you can build a stable and reliable storage system for long and bulky materials.
If you are planning a warehouse project and need a customized solution, explore our Single Sided Cantilever Rack systems designed for industrial storage applications worldwide.